
Storage problems plague every home. Closets overflow with clothes. Kitchen counters disappear under piles of gadgets. Kids’ toys take over living rooms. After five years as a professional organizer and home improvement consultant, I’ve seen these issues in hundreds of homes across the country.
My name is Richard Boren, and I’ve helped families transform their cluttered spaces into organized havens. What I’ve learned is this: expensive storage systems aren’t always the answer. Some of the best solutions come from your own creativity and basic materials you probably already have.
The storage solutions I’m sharing today work because I’ve tested them in real homes. These aren’t fancy Pinterest projects that look good in photos but fail in daily use. These are practical fixes that solve actual storage problems.
Why DIY Storage Solutions Make Sense
Store-bought organizers cost a fortune. A simple drawer organizer can run $30 or more. Closet systems start at hundreds of dollars. Custom built-ins? You’re looking at thousands.
DIY storage offers three major advantages. First, it costs much less. Most projects use materials under $20. Second, you create exactly what fits your space and needs. Third, you can modify and expand these solutions as your needs change.
The key is understanding your specific storage challenges before you start building. I always tell my clients to live with a space for a week before making changes. Watch how you use the area. Notice what gets messy first. This observation guides better solutions.
Solution 1: Magnetic Spice Storage System

Spice cabinets drive people crazy. Small jars fall over. Labels face the wrong way. You buy duplicates because you can’t find what you already own.
Here’s what works better: magnetic spice jars mounted inside cabinet doors or on the side of your refrigerator.
What You Need:
- Small glass jars with metal lids
- Strong neodymium magnets
- Super glue or epoxy
- Labels
- Metal surface or magnetic board
How It Works:
Start with uniform glass jars. Baby food jars work perfectly, but you can buy small mason jars for consistency. Clean them thoroughly and remove any adhesive residue.
Glue strong magnets to the bottom of each jar lid. Use at least two magnets per jar for stability. Let the glue cure for 24 hours before testing.
Mount a metal sheet inside a cabinet door if you don’t have a magnetic surface. Thin steel sheets from the hardware store work well and cost under $15.
Label each jar clearly on the front. I recommend using a label maker for consistency, but handwritten labels work too.
Why This Works:
This system saves cabinet space while making spices visible and accessible. You can see every spice at a glance. The magnetic connection is strong enough to hold full jars but easy enough to remove for cooking.
In my experience, clients who switch to this system use more spices in their cooking. When spices are visible and organized, people actually remember they own them.
| Pros | Cons |
|---|---|
| Saves cabinet space | Requires magnetic surface |
| Spices stay visible | Initial setup time needed |
| Easy to access while cooking | Limited jar size |
| Prevents duplicate purchases | Magnets can lose strength over time |
Solution 2: Under-Stair Storage Transformation
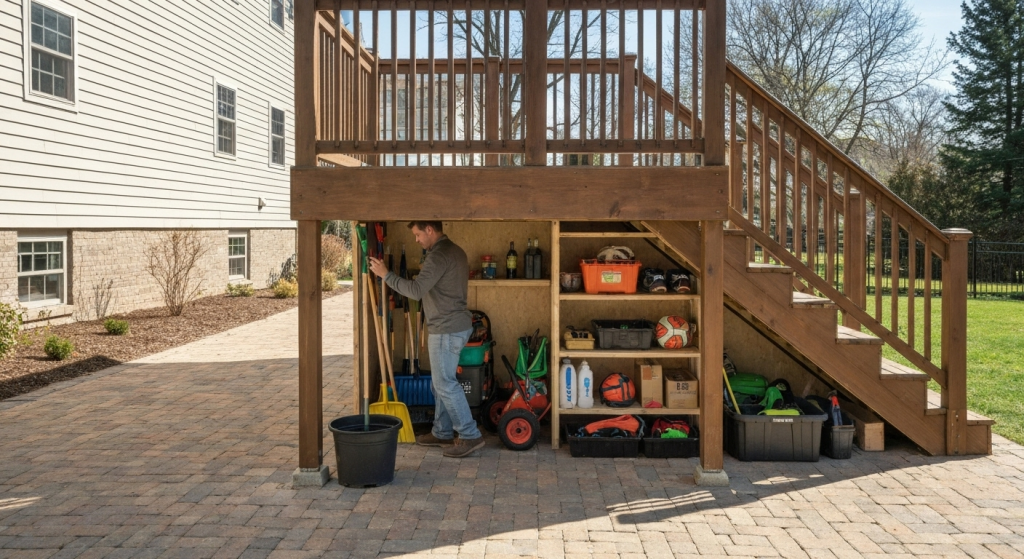
The space under stairs gets wasted in most homes. It becomes a dumping ground for sports equipment, cleaning supplies, and random items that don’t have proper homes.
Turn this dead space into organized storage with custom shelving that follows the stair angle.
Planning the Space:
Measure the height at several points under your stairs. The area closest to the wall will be tallest. Create a diagram showing these measurements.
Decide what you’ll store here. Cleaning supplies work well because you don’t need to access them constantly. Seasonal items like holiday decorations fit perfectly. Sports equipment can work if you create specific zones.
Building the System:
Use adjustable shelving brackets mounted to the wall studs. This approach adapts to the slanted ceiling while providing strong support.
Cut shelves to fit each section. Plywood works well and costs less than finished lumber. Sand the edges and apply a simple stain or paint for a finished look.
Add bins or baskets for smaller items. This prevents things from falling off shelves and makes the space look neater.
Organization Strategy:
Group similar items together. Put frequently used items at eye level in the tallest section. Store seasonal or rarely used items in the lower areas.
Label everything clearly. Even if you know what’s in each basket, labels help other family members maintain the system.
Create a simple inventory list. Post it on the inside of a nearby door. This prevents overbuying and helps you find things quickly.
Real-World Results:
I installed this system in the Johnson family’s home last year. They freed up an entire closet by moving cleaning supplies and sports equipment under the stairs. The kids can now access their bikes and soccer gear without digging through piles.
The key is treating this space like a real room, not a storage cave. Good lighting makes a huge difference. Battery-powered LED strips cost under $20 and transform how you use the space.
Solution 3: Vertical Wall-Mounted Tool Organization
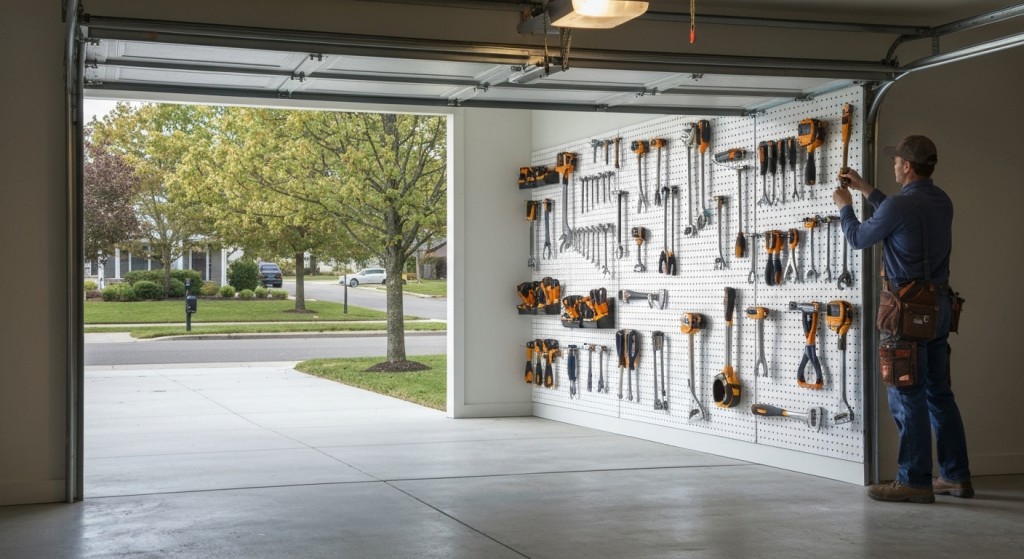
Garage and workshop organization frustrates many homeowners. Tools disappear into drawers. Frequently used items hide behind rarely used ones. You waste time searching instead of working on projects.
Pegboard systems work, but here’s a better approach: create custom tool holders that mount directly to the wall.
The System:
Use furring strips to create a grid pattern on your wall. This gives you mounting points anywhere you need them.
Make custom holders for each tool type. Drill holes in wood blocks for screwdrivers. Cut slots for wrenches. Create hooks for power tool cords.
Paint or stain everything the same color for a professional look. White or light gray makes tools easier to see.
Advanced Features:
Add a power strip behind the grid for cordless tool charging. Route the cords through holes in the wood strips for a clean appearance.
Create shadow outlines of each tool using spray paint and stencils. This shows exactly where each tool belongs and makes missing tools obvious.
Include small shelves for screws, nails, and other hardware. Mason jars mounted under shelves keep small parts visible and organized.
Why This Beats Pegboard:
Custom holders fit your specific tools perfectly. Unlike pegboard hooks that fall off or don’t fit right, these holders stay put and work exactly as intended.
The grid system grows with your tool collection. Add new holders anywhere without buying additional pegboard sections.
Personal Experience:
I built this system in my own garage three years ago. It cut my project prep time in half because I can find any tool in seconds. Friends who visit always comment on how organized it looks.
The initial investment was about $60 for materials. Compare that to commercial tool storage systems that start at $200 and don’t fit your tools as well.
Solution 4: Hidden Storage Ottoman Creation
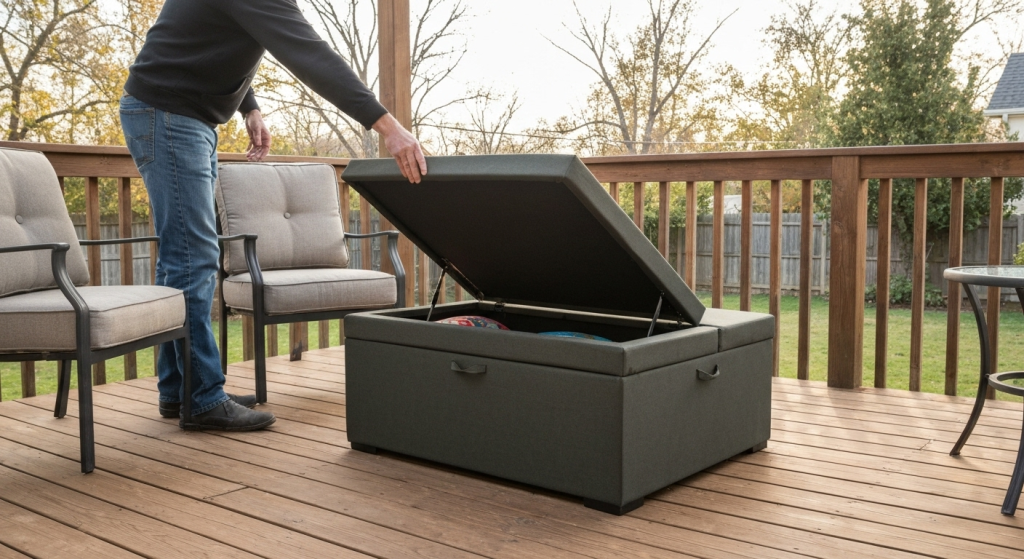
Living rooms need extra seating and storage, but most solutions choose one or the other. Storage ottomans from stores cost $100 or more and often don’t match your furniture.
Build a custom storage ottoman that matches your space perfectly and costs under $40.
Construction Details:
Start with a wooden crate or build a simple box from plywood. The dimensions depend on your needs, but 18x18x16 inches works well for most rooms.
Add hinges to create a lid. Piano hinges work best because they support the entire width of the lid.
Install soft-close hardware to prevent the lid from slamming. This protects fingers and reduces noise.
Comfort Features:
Add foam padding to the top for comfortable seating. High-density foam lasts longer than cheap alternatives.
Cover everything with fabric that matches or complements your existing furniture. Use a staple gun to attach the fabric securely.
Add furniture legs or casters if you want the ottoman to be mobile. Locking casters prevent unwanted movement.
Storage Organization:
Line the interior with fabric for a finished appearance. This also prevents items from snagging on rough wood.
Add dividers if you plan to store different types of items. Cardboard dividers work fine and cost almost nothing.
Include a tray for small items like remotes, chargers, or reading glasses.
Versatility Benefits:
This ottoman works as extra seating when guests visit. It serves as a coffee table for casual meals. The storage handles blankets, games, or electronics.
Unlike purchased ottomans with fixed compartments, you can reconfigure the interior as your needs change.
| Feature | DIY Version | Store-Bought |
|---|---|---|
| Cost | $30-40 | $100-200 |
| Customization | Complete control | Limited options |
| Size options | Exact fit for space | Standard sizes only |
| Repair | Easy to fix | Often not repairable |
Solution 5: Modular Closet Expansion System
Most bedroom closets waste vertical space. A single rod leaves the upper area empty while clothes pile up below.
Create a modular system that adapts to different clothing types and changes with your wardrobe.
Design Principles:
Double-hang shorter items like shirts and pants folded over hangers. This immediately doubles your hanging space.
Use the upper area for longer items like dresses and coats, or for storage bins containing seasonal clothes.
Add drawers or shelves at the bottom for shoes, folded clothes, or accessories.
Building the Framework:
Install a second closet rod using adjustable brackets. Position it about 40 inches from the floor for optimal use.
Add wire shelving above both rods for storage bins. Wire shelves allow air circulation and prevent musty odors.
Include pull-out drawers at the bottom. You can build simple boxes that slide on runners, or use plastic drawers from the discount store.
Organization Strategy:
Group clothes by type and frequency of use. Put everyday items at eye level. Store seasonal clothes higher up.
Use matching hangers throughout the closet. This simple change makes everything look neater and saves space.
Add good lighting. Battery-powered LED strips under each shelf illuminate the entire closet.
Seasonal Adaptations:
This system adjusts as your clothing needs change. In winter, use the upper rod for heavy coats. In summer, store winter clothes in bins above.
The modular approach means you can move components around without rebuilding everything.
Results in Real Homes:
The Martinez family tripled their closet capacity using this system. They went from cramped quarters to having space for growth.
The key insight is that most closets only use about 40% of their available space. This system captures the rest without expensive custom work.
Making These Solutions Work Long-Term
DIY storage succeeds or fails based on maintenance and adaptation. Here’s what keeps these systems working years later.
Maintenance Requirements:
Check mounting hardware every six months. Tighten loose screws before they cause problems.
Clean systems regularly. Dust and dirt make storage less appealing to use.
Replace worn components promptly. A broken drawer or loose hinge undermines the entire system.
Adaptation Strategies:
Plan for changes from the beginning. Use adjustable brackets and modular components when possible.
Document your systems with photos and measurements. This helps when you need to modify or expand them.
Keep extra materials for future adjustments. A small supply of matching wood, hardware, and fabric makes changes easier.
Family Buy-In:
Involve family members in planning and building. People maintain systems better when they help create them.
Make sure everyone understands how each system works. Post simple instructions if needed.
Address problems quickly. Small frustrations grow into system abandonment if ignored.
Cost Analysis and Material Sources
DIY storage saves significant money compared to commercial solutions, but smart shopping maximizes these savings.
Budget Breakdown by Project:
Magnetic spice system: $15-25 for magnets, jars, and labels Under-stair storage: $40-60 for lumber and hardware Tool organization: $50-80 for strips, holders, and hardware Storage ottoman: $35-50 for materials and fabric Closet system: $60-100 for rods, brackets, and shelving
Smart Shopping Tips:
Buy lumber from home improvement stores during sales. Stock up on common sizes when prices drop.
Check thrift stores for containers, baskets, and fabric. You often find high-quality items at fraction of retail cost.
Use online retailers for specialty hardware like strong magnets or soft-close hinges. Local stores often don’t stock these items.
Time Investment:
Most projects take a weekend to complete. The tool organization system requires the most time due to custom fitting each holder.
Factor in planning time. Measuring, sketching, and shopping take as long as building for most projects.
Frequently Asked Questions
How long do DIY storage solutions typically last? Well-built DIY systems last 5-10 years with normal use. The key is using quality hardware and maintaining the systems properly. Most failures happen due to inadequate mounting or cheap materials, not design flaws.
Can renters use these storage solutions? Most of these projects work in rental properties. Focus on solutions that don’t require permanent changes. The magnetic spice system and storage ottoman work anywhere. For mounted systems, use temporary mounting methods or get landlord permission.
What tools do I need for these projects? Basic hand tools handle most projects: drill, saw, level, measuring tape, and screwdrivers. You might need to borrow or rent specialized tools like a miter saw for precision cuts, but many home improvement stores cut lumber to size.
How do I know if a DIY storage solution will work in my space? Start by measuring your space carefully and observing how you currently use it. Sketch your ideas and live with them for a few days before building. Most problems come from not understanding how the space gets used daily.
Conclusion
Effective storage doesn’t require expensive systems or professional installation. These five DIY solutions work because they solve real problems with practical approaches.
The magnetic spice system eliminates cabinet chaos while making cooking more enjoyable. Under-stair storage captures wasted space for items you need but don’t use daily. Wall-mounted tool organization cuts project time and frustration. Custom storage ottomans provide seating and storage while matching your décor. Modular closet systems adapt to your changing wardrobe needs.
Success comes from understanding your specific storage challenges before you build. Take time to observe how you use each space. Plan systems that fit your habits, not just your stuff.
Start with one project that addresses your biggest storage frustration. Master that system before moving to the next challenge. This approach builds confidence and skills while solving problems one at a time.
Remember that storage systems require maintenance and occasional updates. Budget time and materials for these needs. A well-maintained DIY system outperforms expensive commercial solutions that get neglected.
These solutions have transformed storage in hundreds of homes I’ve worked with over the past five years. They’ll work in your home too, but only if you commit to building them properly and maintaining them consistently.