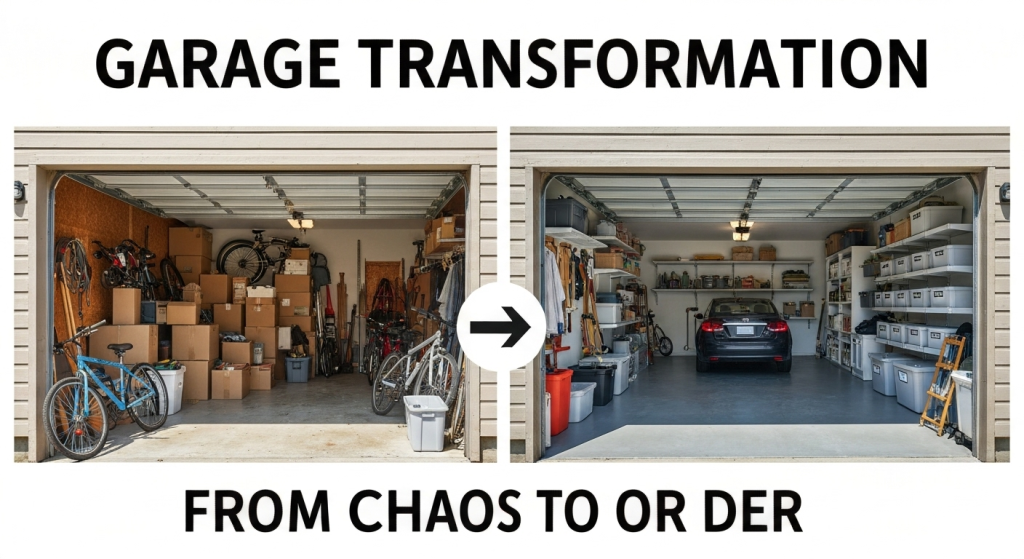
Your garage doesn’t have to be a dumping ground for everything you don’t know where to put. With the right approach, you can turn this often-overlooked space into one of the most useful areas of your home.
I’m Richard Boren, and I’ve spent the last five years helping homeowners reclaim their garages through professional organization consulting. What started as a side business organizing neighbors’ garages has grown into a full-time practice where I’ve transformed over 200 garage spaces. From single-car garages packed floor-to-ceiling with boxes to three-car garages that couldn’t fit a bicycle, I’ve seen it all.
The garage organization process isn’t just about making things look neat. It’s about creating a system that works for your specific needs and lifestyle. Through years of trial and error with my own garage and countless client projects, I’ve developed a proven method that turns chaos into order.
Why Most Garage Organization Attempts Fail
Most people approach garage organization backwards. They buy shelving units and storage containers before understanding what they actually need to store. This leads to wasted money and systems that fall apart within months.
The biggest mistake I see homeowners make is trying to organize everything at once. This overwhelming approach leads to burnout and half-finished projects. Instead, successful garage organization follows a specific sequence that builds momentum and creates lasting results.
Another common problem is ignoring the garage’s dual purpose. Your garage needs to function as both storage space and, potentially, a place to park your car. Many organization systems fail because they don’t account for this balance.
The Complete Garage Assessment Process
Before moving a single item, you need to understand what you’re working with. Start by measuring your garage dimensions, including ceiling height. Note the location of electrical outlets, water spigots, and any structural elements like support beams.
Document your current parking needs. Do you park one car, two cars, or use the space for other purposes? This decision impacts every aspect of your organization plan.
Create a rough sketch of your garage layout. You don’t need artistic skills – a simple rectangle with measurements works perfectly. Mark doors, windows, and any permanent fixtures. This sketch becomes your planning tool for the entire project.
Take photos from multiple angles. These “before” pictures serve two purposes: they help you remember where things were originally located, and they provide motivation when the project feels overwhelming.
Inventory Categories That Actually Matter
During my years organizing garages, I’ve identified seven main categories that cover 95% of what people store:
Seasonal items include holiday decorations, winter gear, and summer equipment. These items get used predictably and can be stored in less accessible areas.
Tools and hardware encompass everything from screwdrivers to lawn equipment. These need easy access and protection from moisture.
Sports equipment covers bicycles, balls, camping gear, and recreational items. This category often requires specialized storage solutions.
Automotive supplies include car care products, spare parts, and maintenance items. Keep these together and easily accessible.
Household overflow consists of extra furniture, appliances, and items waiting for donation. This category should be temporary.
Garden supplies cover fertilizers, plant pots, hoses, and outdoor maintenance items. These need organization but can tolerate temperature changes.
Storage items include empty boxes, moving supplies, and organizational tools. Don’t let this category take over your garage.
The Three-Phase Decluttering System
Phase 1: The Complete Emptying
Choose a clear weekend for this phase. You’ll need the garage completely empty to properly assess the space and clean thoroughly. Move everything to your driveway, back yard, or inside your house temporarily.
This phase feels overwhelming, but it’s essential. You cannot properly organize around existing clutter. Plus, seeing your empty garage helps you visualize the potential of the space.
Clean the empty garage thoroughly. Sweep walls, wash windows, and address any maintenance issues. Check for pest problems, water damage, or structural concerns. It’s much easier to handle these issues now than after you’ve reorganized everything.
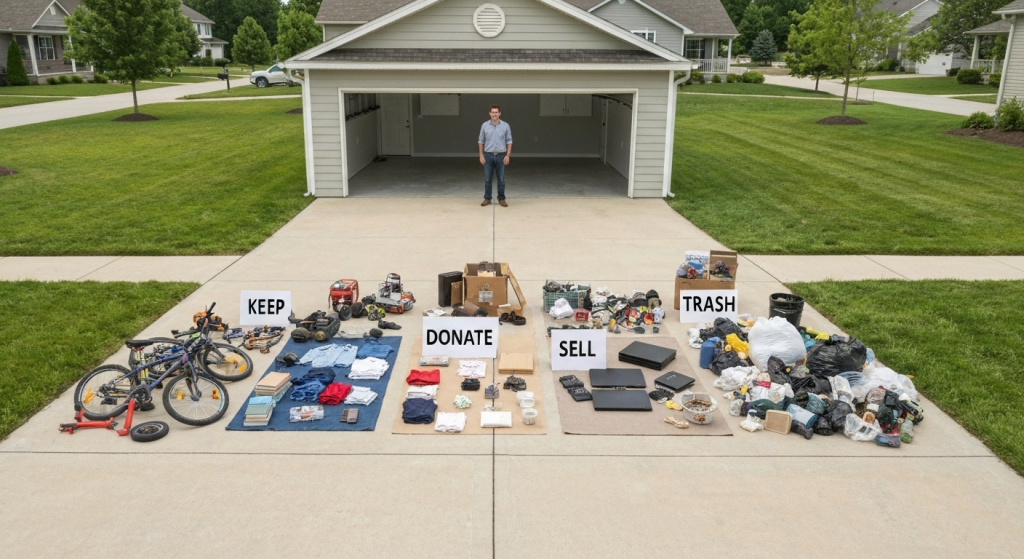
Phase 2: The Ruthless Sort
Now comes the hardest part – deciding what stays and what goes. Create four distinct areas in your temporary staging space: Keep, Donate, Sell, and Trash.
Be honest about what you actually use. That exercise equipment gathering dust? The holiday decorations you haven’t touched in three years? The broken items you’ll “fix someday”? These need to go.
Here’s my rule: if you haven’t used something in two years and it’s not a true emergency item, donate it. This rule alone typically eliminates 30-40% of garage contents.
For sentimental items, create a small “maybe” pile. Come back to these items after sorting everything else. You’ll often find it easier to make decisions once you see how much space you actually have.
Phase 3: The Strategic Keep Pile
Your “keep” items need further sorting into the seven categories mentioned earlier. This step reveals patterns in what you own and helps identify storage needs.
Look for duplicates within categories. Do you really need three sets of jumper cables? Five rakes? Multiple coolers? Keep the best version of each item and donate the rest.
Group similar items together during this phase. This makes it easier to see exactly what storage solutions you’ll need for each category.
Smart Storage Solutions That Actually Work
Vertical Storage Systems
Wall-mounted systems maximize floor space while keeping items accessible. Pegboards work excellently for tools, but they’re not the only option. Track systems with moveable hooks and shelves adapt as your needs change.
I’ve installed dozens of different wall storage systems. The most successful ones share three characteristics: they’re easy to reconfigure, they keep items visible, and they can handle varying weights.
Pegboard Systems
- Best for: Hand tools, small garden tools, craft supplies
- Pros: Infinitely customizable, inexpensive, widely available
- Cons: Limited weight capacity, can look cluttered if overloaded
Track Systems
- Best for: Heavy tools, bikes, large equipment
- Pros: High weight capacity, professional appearance, easily reconfigured
- Cons: Higher initial cost, requires proper installation
Cabinet Systems
- Best for: Items needing protection from dust, chemicals, small parts
- Pros: Clean appearance, secure storage, weather protection
- Cons: Most expensive option, items less visible
Ceiling Storage Options
Overhead storage handles seasonal items and bulky objects you don’t access frequently. The key is installing systems that don’t interfere with garage door operation or create safety hazards.
Platform systems work well for boxes and containers. Make sure anything stored overhead is properly secured and won’t fall if accidentally bumped.
Pulley systems excel for bikes and kayaks. These systems let you easily raise and lower heavy items without strain. I’ve installed dozens of these, and they consistently rank as homeowners’ favorite garage upgrade.
Floor Storage Strategies
Not everything needs to hang on walls. Strategic floor storage keeps frequently used items accessible while maintaining clear pathways.
Rolling storage carts provide flexibility for items you use in different areas. Tool carts can move from garage to yard to basement as needed.
Clear storage containers work better than cardboard boxes for most items. You can see contents without opening every container, and they protect against moisture and pests.
Creating Functional Zones
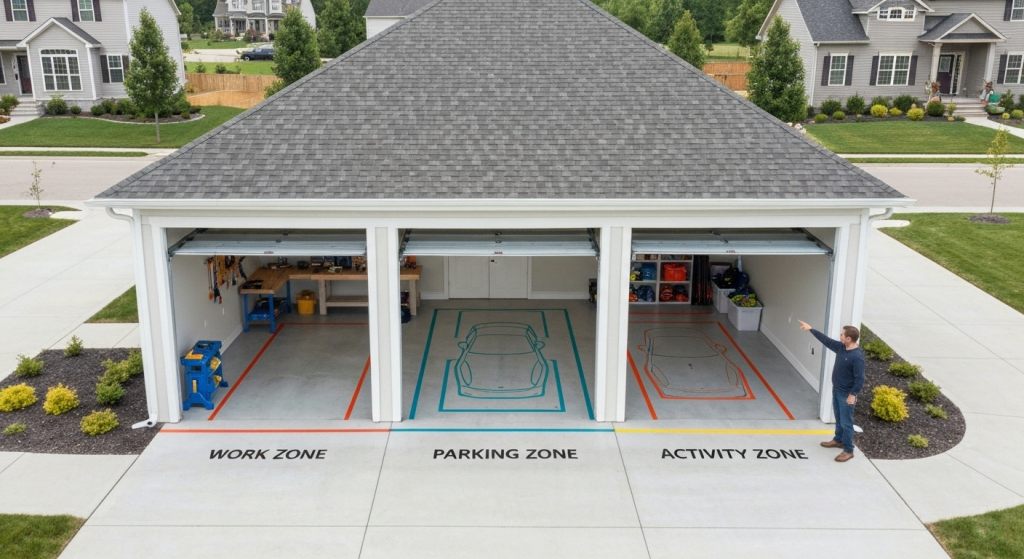
The Work Zone
Every organized garage needs a designated work area. This doesn’t require a full workbench – even a small folding table creates a dedicated space for projects and repairs.
Good lighting is essential for any work area. If your garage doesn’t have adequate overhead lighting, add task lighting over your work surface.
Keep basic tools easily accessible in this zone. A simple toolbox or wall-mounted tool storage keeps essentials within arm’s reach.
The Parking Zone
If you park cars in your garage, maintain clear boundaries for this space. Use floor tape or paint to mark parking areas and ensure adequate clearance for doors and walking paths.
Consider the turning radius needed to back cars in and out. Many organization systems fail because they don’t account for maneuvering space.
Wall protection prevents dings and scratches. Pool noodles, foam padding, or commercial bumper guards protect both cars and walls.
The Activity Zone
Designate specific areas for different activities. Gardening supplies work best near outdoor access. Sports equipment needs easy access for kids and adults. Automotive supplies should be near where you park.
This zoning approach prevents the random dumping that destroys organization systems. When everything has a designated home, family members know where to put things back.
Storage Solutions Comparison
| Storage Type | Initial Cost | Weight Capacity | Flexibility | Best For |
|---|---|---|---|---|
| Pegboard | Low | Light items | High | Hand tools, small items |
| Metal Shelving | Medium | Heavy items | Medium | Boxes, containers, bulk items |
| Cabinet Systems | High | Medium items | Low | Protected storage, chemicals |
| Ceiling Platforms | Medium | Heavy items | Low | Seasonal items, bulky storage |
| Rolling Carts | Low | Medium items | Very High | Mobile tool storage, cleaning supplies |
The Step-by-Step Organization Process
Week 1: Foundation Setup
Start with basic cleaning and any necessary repairs. Install primary lighting if needed. This week focuses on creating a clean, safe workspace for the organization process.
Address any structural issues now. Leaky roofs, damaged flooring, or electrical problems need fixing before you invest in organization systems.
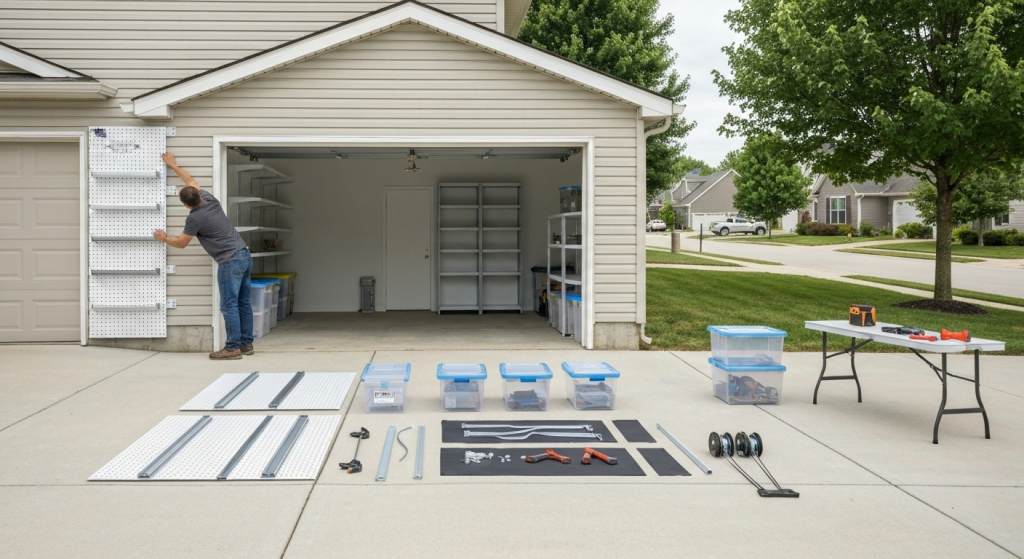
Week 2: Primary Storage Installation
Install your main storage systems starting with wall-mounted options. Begin with the largest, heaviest systems first. This approach prevents having to work around smaller installations later.
Take time to properly anchor wall systems. Garage walls often have irregular stud spacing, so use appropriate fasteners for your wall type.
Week 3: Category Organization
Begin organizing by category, starting with the items you use most frequently. Tools and automotive supplies typically get prime real estate, followed by seasonal items in less accessible areas.
Label everything clearly. Even obvious categories benefit from labels because they help other family members maintain the system.
Week 4: Fine-Tuning and Testing
Test your system by using items and putting them back. This reveals problems with accessibility or location choices before they become habits.
Make adjustments based on real use. The perfect system on paper might need tweaks in practice.
Common Organization Mistakes to Avoid
Overbuying Storage Solutions
The biggest waste of money in garage organization is buying storage before understanding exactly what you need. I’ve seen homeowners spend hundreds on shelving that doesn’t fit their space or storage needs.
Shop for storage solutions only after completing your decluttering and measuring phase. Bring your measurements and inventory list when shopping.
Ignoring Family Input
Organization systems fail when they don’t work for everyone who uses the space. Include family members in planning, especially for items they use regularly.
Consider physical limitations and heights. A system that works for adults might be completely unusable for children or shorter family members.
Creating Systems Too Complex
Simple systems get maintained. Complex systems get abandoned. If your organization system requires more than two steps to put something away, it’s probably too complicated.
Avoid over-categorizing items. You don’t need separate areas for every type of screwdriver. Group similar items together in broader categories.
Maintenance Strategies That Work
The Monthly Reset
Schedule 30 minutes each month to reset your garage organization. This prevents small messes from becoming major problems.
During monthly resets, focus on returning misplaced items to their designated homes and addressing any system breakdowns.
Seasonal Adjustments
Adjust your system seasonally to account for changing needs. Summer equipment needs easy access during warm months but can be stored overhead during winter.
This seasonal rotation prevents overcrowding and ensures the most-used items stay accessible year-round.
Family Maintenance Rules
Establish simple rules that everyone can follow:
- Put things back where you found them
- Don’t set items on the floor “temporarily”
- Clean up after projects before starting new ones
- Ask before reorganizing someone else’s area
Cost-Effective Organization Ideas
DIY Storage Solutions
Many effective storage solutions cost very little to build. PVC pipe organizers work excellently for long-handled tools. Pegboard costs a fraction of commercial tool storage systems.
Repurpose household items creatively. Large coffee cans work well for hardware storage. Old kitchen organizers can hold cleaning supplies or small tools.
Budget-Friendly Commercial Options
Start with basic wire shelving units for general storage. These cost much less than custom systems but provide significant organization improvement.
Shop end-of-season sales for storage containers. Buy clear containers in standard sizes so they stack efficiently and you can see contents.
Investment Priorities
If budget is limited, invest first in solutions for items you use most frequently. A good tool storage system pays for itself in time saved and frustration avoided.
Consider the cost of replacing lost or damaged items. Proper storage for expensive tools and equipment often pays for itself by preventing loss and damage.
Seasonal Organization Strategies
Spring Setup
Spring garage organization focuses on transitioning from winter storage to active use. Move gardening supplies to easily accessible areas. Check and maintain outdoor equipment before first use.
This is also an excellent time for deep cleaning and addressing any winter damage to your organization systems.
Summer Maintenance
Summer brings heavy garage use for outdoor activities. Focus on maintaining clear pathways and ensuring frequently used items stay accessible.
Hot weather can affect some storage materials. Check that plastic containers aren’t warping and metal systems aren’t showing rust or corrosion.
Fall Preparation
Fall preparation involves transitioning summer items to storage and preparing for winter equipment access. This seasonal swap prevents overcrowding and keeps relevant items accessible.
Use fall organization time to conduct your annual decluttering review. What didn’t get used this year probably won’t get used next year either.
Winter Organization
Winter garage organization focuses on protection and accessibility. Ensure heating systems and snow equipment are easily reachable. Protect stored items from cold damage.
Consider adding temporary heating if you’ll be working on projects during cold months. Many organization tasks are much easier in moderate temperatures.
Measuring Success
Functional Metrics
Success isn’t just about appearance. Can you find what you need quickly? Can you park your car easily? Can multiple people use the space without conflicts?
Track time saved. If you can find tools quickly and complete projects efficiently, your organization system is working.
Long-Term Sustainability
The best test of garage organization is sustainability. Systems that still work after six months are likely to work long-term. Systems that break down quickly need adjustment.
Monitor which areas consistently stay organized and which ones attract clutter. This information guides future improvements.
Frequently Asked Questions
How long does it take to organize a typical garage? Most garages can be completely organized in 2-3 weekends if you follow a systematic approach. The decluttering phase takes the most time, while installation and setup move quickly once you have a plan.
What’s the biggest mistake people make when organizing garages? Trying to organize around existing clutter instead of decluttering first. You can’t create an effective system when you’re working around items you don’t actually need or use.
How much should I budget for garage organization? Basic organization using DIY solutions costs $200-500. Professional systems range from $1000-3000. The investment pays for itself in functionality and prevents costly mistakes from poor planning.
Do I need professional help to organize my garage? Most homeowners can successfully organize their garages using a systematic approach. Consider professional help if you have complex storage needs, limited time, or want custom solutions.
Conclusion
Transforming your garage from cluttered chaos to organized functionality requires planning, effort, and the right approach. The key is following a systematic process that addresses decluttering, planning, and implementation in the correct sequence.
Remember that garage organization is not a one-time event but an ongoing system that needs occasional maintenance and adjustment. The time you invest in creating proper systems pays dividends in convenience, functionality, and peace of mind.
Your organized garage should work for your specific needs and lifestyle. Don’t get caught up in creating magazine-perfect spaces that don’t function well for your family. Focus on systems that are simple to maintain and actually improve your daily life.
The satisfaction of opening your garage door to reveal an organized, functional space never gets old. More importantly, you’ll save time, reduce stress, and maybe even rediscover items you forgot you owned. Start with the decluttering phase, follow the systematic approach, and soon you’ll have the organized garage you’ve always wanted.